Receiving Inventory Items in D365 Business Central

Learn how to correctly receive inventory items in Microsoft Dynamics 365 Business Central after a purchase order has been created.

Efficient inventory management is crucial to ensuring smooth operations and accurate record-keeping. Before items can be used, sold, or tracked within your business, it's important to follow a consistent process for receiving inventory. This training article walks you through the step-by-step process to ensure accurate inventory tracking and reliable financial records.
Understanding Purchase Orders
The first step in inventory management is to create a purchase order (PO) for the vendor. This document serves as a formal request for goods, specifying quantities, descriptions, and agreed-upon terms. Properly documenting the purchase order ensures clarity and facilitates smoother communication between your business and suppliers.
Once the products, items, or goods have arrived at your location and have been verified for accuracy and condition, the next step is to confirm their receipt in Business Central. This involves updating the system to reflect the actual quantities received, ensuring that inventory records are accurate and up to date. Timely and accurate entry into Business Central helps prevent discrepancies and supports reliable stock management.
How to Receive in Business Central
Locate Your Purchase Order
To locate your purchase order in Business Central, use the Global Search feature. Click on the search icon or press Alt+Q on your keyboard, then type "Purchase Orders" in the search bar and click on it.
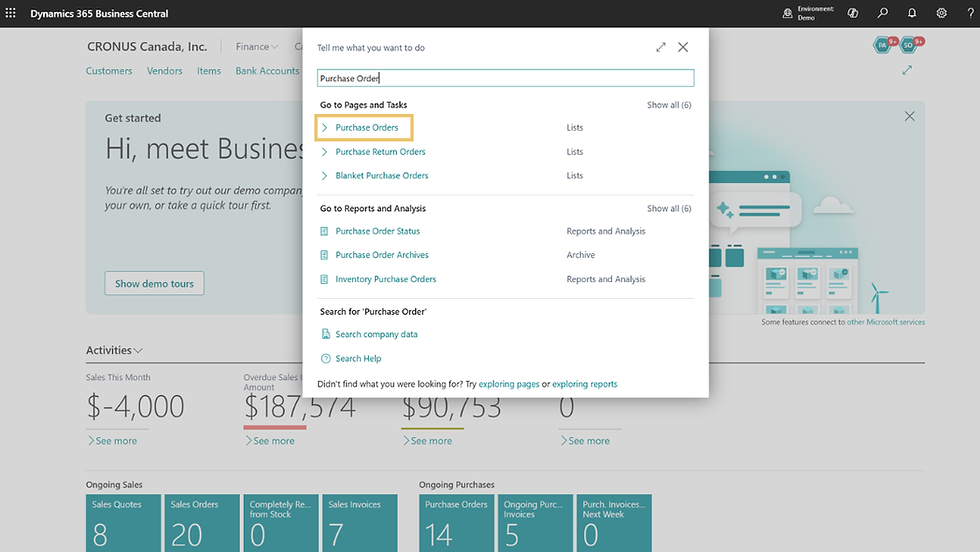
Search for your purchase order by using the search bar or scroll through the list to locate it. When you find the correct purchase order, open it by selecting the PO number itself.

View Quantity to Receive
After opening the purchase order, navigate to the Lines section where all ordered items are displayed. Review the listed items to ensure they match what was physically received in the Quantity to Receive field. This step is critical for ensuring your system reflects the correct inventory on hand.

Post the Purchase Receipt
Before posting, make sure the Posting Date is entered in the purchase order header. This ensures the transaction is recorded in the correct accounting period.
To post the receipt, select Post > Receive.

In the dialog box that opens, confirm Receive is selected and click OK to complete the process.
This action updates inventory levels and confirms items are officially received into stock.

Verify the Receipt
After posting, return to the Lines section of the purchase order and confirm that the Quantity Received field has been updated. This verifies that the inventory has been successfully recorded in the system.

Note: This process covers receiving inventory only. It does not include invoicing the purchase order.
Got Questions? Kwixand Solutions Can Help
Feel free to get in touch with the team at Kwixand Solutions for assistance if you still have questions. Don't forget to subscribe to our YouTube channel for more Business Central training videos, and stay connected with us on LinkedIn, Facebook, and Instagram, for the latest updates.