
How to Manage the Sales Process in Microsoft Dynamics 365 Business Central
- Kwixand Team

- Mar 19, 2024
- 5 min read
Learn how to leverage Business Central's features to streamline your sales process and drive success.

Navigating the sales process in Microsoft Dynamics 365 Business Central is essential for maximizing revenue and customer satisfaction. This guide provides practical insights and strategies for efficiently managing the sales process within the Business Central platform in 6 easy steps.
Step 1: Setting Up Your Sales Process in Microsoft Dynamics 365 Business Central
In this step we will go through several basic sales processes and configure various settings such as salespeople, sales groups, sales territories, and sales campaigns. You can do this by navigating to the sales and receivable setup page in Business Central.
Click on the Search icon in the upper right-hand corner of the screen.

Then, simply type sales and receivables into the Search Bar.

Select Sales & Receivables Setup.
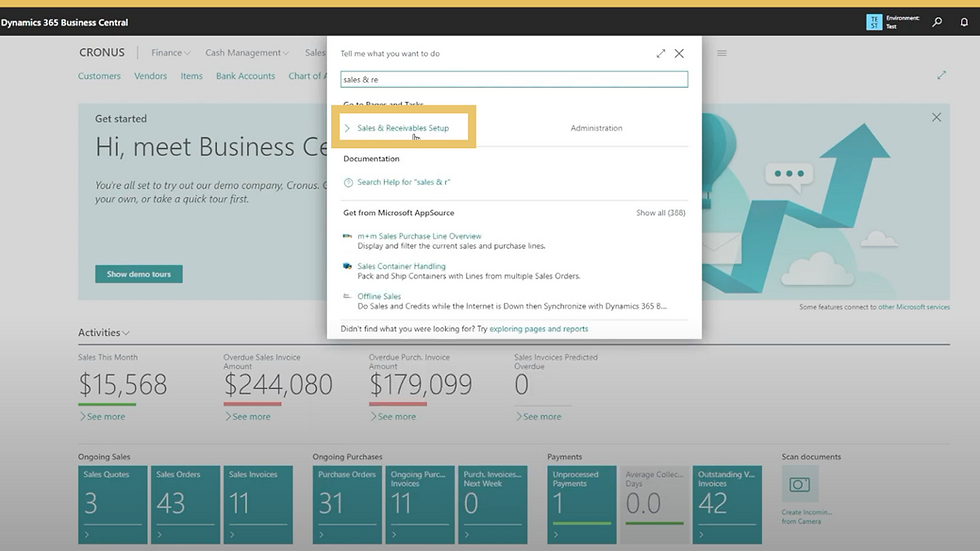
From here, you can see the various fields available for configuration. Select Customer Groups for additional selections.

You can set up a Customer Posting Group.

You can also set up Customer Price Groups from here.

Step 2: Creating a Sales Quote in Microsoft Dynamics 365 Business Central
To create a sales quote, click the Search icon again to use the search bar and look up sales quote.
Select Sales Quote from the menu.

Once you are in the Sales Quote screen, select New.

From this screen, you can enter the details of the customer, the products or services that are being sold, and any applicable discounts or promotion. You can also add notes and attachments to the quote.

You can enter a new Customer Name.

Or select an existing Customer Name from the dropdown menu.

Then, select the Item Number from the dropdown menu.

Next, set the Due Date of the sales quote.

And set the Requested Delivery Date of the sales quote.

Next, move down to the first line item and add the item Quantity.

Once you enter the quantity, simply click on the field under Line Amount Excluding VAT and it will populate the price.

You can also apply Discounts to the item and the price will automatically update.

Scroll down to navigate to the invoice details where you can change the Currency Code.
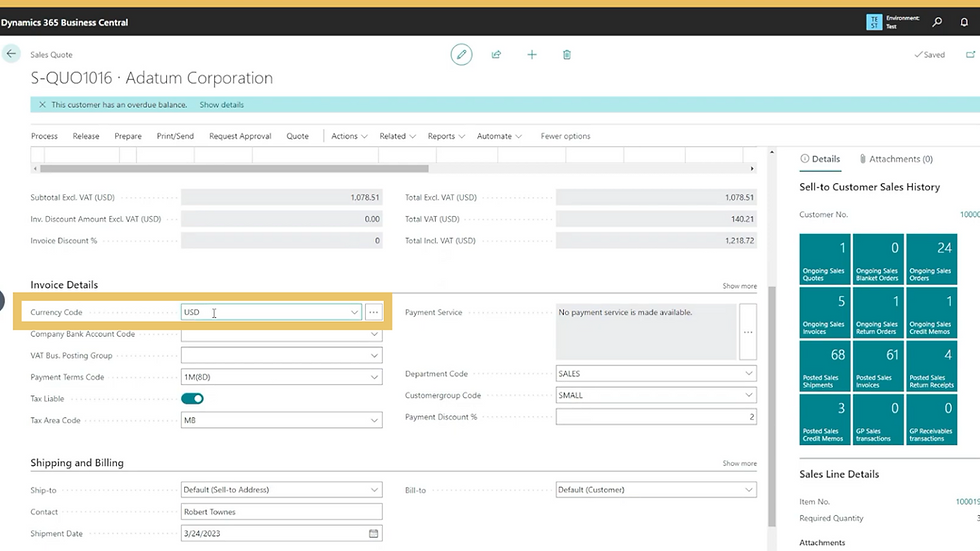
You can also change the Payment Terms Code.

Next, verify the Ship To information.

And the Bill To information.

Once you have verified all of the information in the quote is correct, you can release the sales quote by selecting Release at the top of the screen.

And select Release from the menu to create the sales quote.

Now, you can print or send the sales quote by selecting Print/Send.

Select Print to create a physical copy.
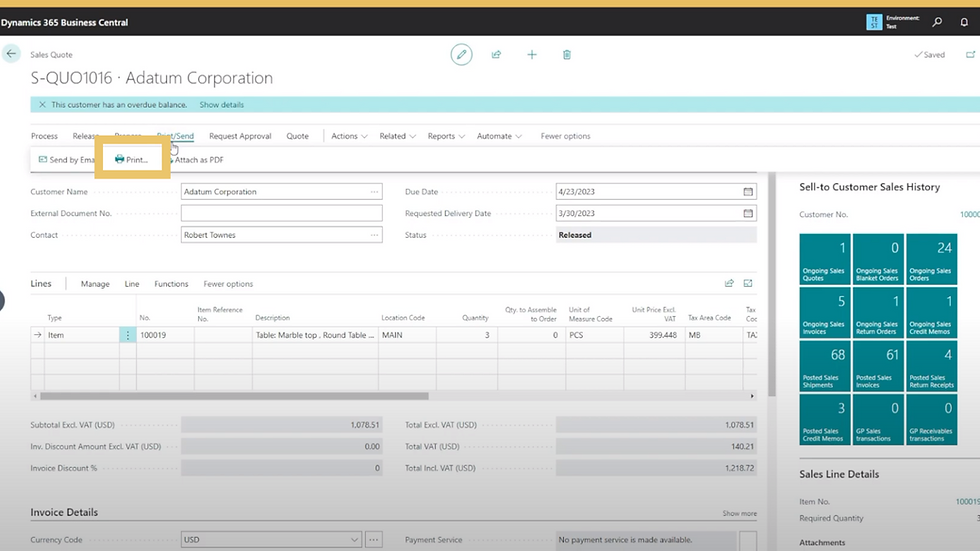
Or you can create a PDF by selecting Attach PDF.

Or you can send an email directly from Business Central by selecting Send by Email.

Step 3: Converting Sales Quotes to Sales Orders in Microsoft Dynamics 365 Business Central
The next step, once the customer has agreed to the sales quote, is to convert the quote to a sales order. You can convert the sales quote to sales order by clicking on the Action button at the top of the screen.

From the dropdown menu, select Create.

From there, another menu will appear. Then, select Other.

A final menu will appear. Select the first option, Make Order.

Select Yes for both popup notifications.
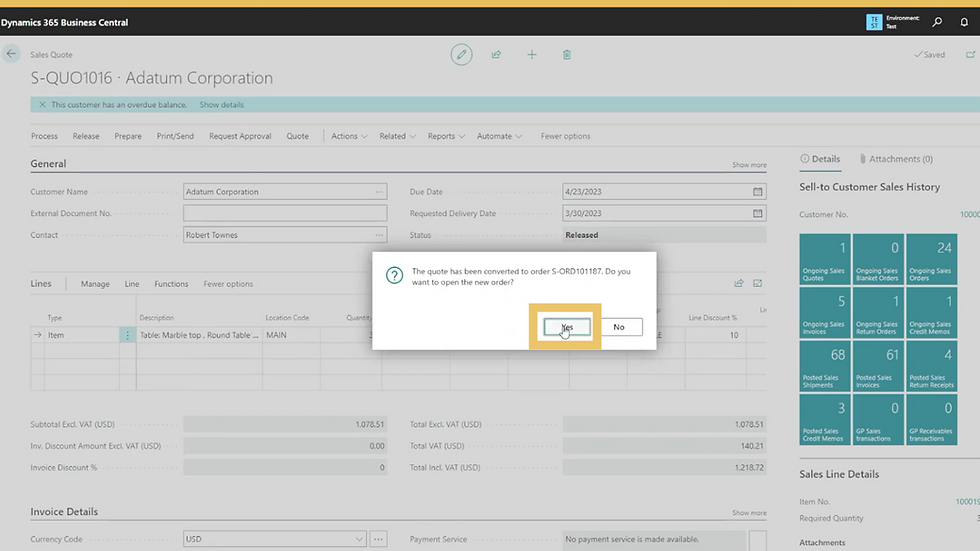
This will create the sales order and take you to the sales order page where you can verify the information has been correctly pulled over from the sales quote.

Step 4: Create a Sales Invoice in Microsoft Dynamics 365 Business Central
Now you’re ready to create the sales invoice. First, you’ll need to release this sales order by selecting Release at the top of the screen.

Just like with the sales quote release, you will then select Release from the menu bar.

Next, select Posting from the selections at the top of the screen.

Then click Post from the menu bar.

This will bring up a popup box with options to select Ship, Invoice, or Ship & Invoice. Once you make your selection, hit the OK button.

Once the invoice has been created, another popup with show up asking if you would like to open the posted invoice. Click Yes to view the invoice.

This will take you to the Posted Sales Invoice screen where you can view the finalized sales invoice.

Step 5: Apply Payment to the Sales Invoice in Microsoft Dynamics 365 Business Central
The next step is to apply the payment to the sales invoice. To apply payment to the sales invoice, navigate back to your Business Central home screen and select Cash Management at the top.

From the Cash Management menu, select Payment Journals.

Once you are in the payment journals screen, select CASH.

Scroll over to the right until you find the Account Type field and select Customer from the dropdown menu.

Next, click on the dropdown under Account No. and select the customer account number that matches the invoice. This will automatically populate related fields.

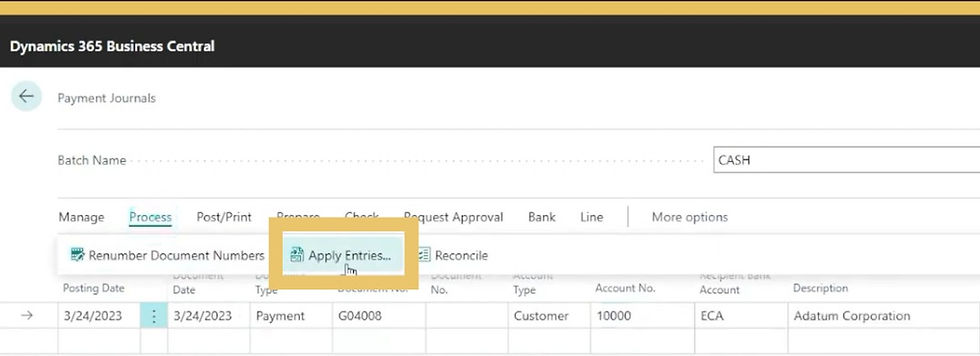
Once you have verified that all of the information is correct, go to the top of the screen and select Process.

Then select Apply Entries from the process menu.
This will bring up the Apply Customer Entries screen with all of the invoices for that customer. Sort by Posting Date to find the most recent invoice.

Enter the Document No. into the Applies-to ID field.

Then select OK at the bottom of the window.

The window will close, and you can will be back on the main Payment Journals screen. Finally, select Post/Print from the top of the screen.

Select Post from the menu bar.

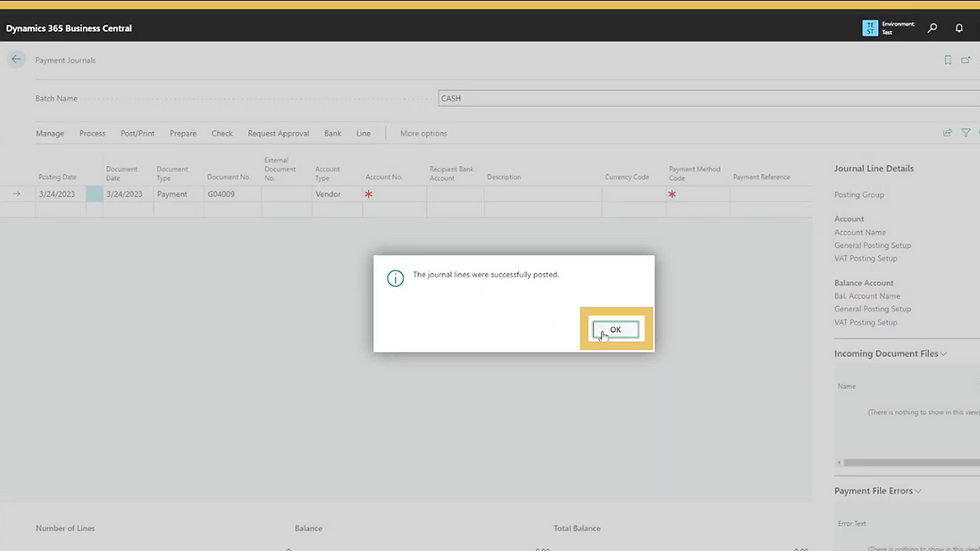
This will trigger a popup asking if you want to post the journal lines. Select Yes.

You will then have another popup confirming that the journal lines were successfully posted. Click OK.
Step 6: Monitoring the Sales Performance in Microsoft Dynamics 365 Business Central
You can monitor sales performance by reviewing various reports such as sales statistics by item, sales statistics by customer, and sales statistics by salesperson. You can access these reports by using the Search icon again at the top righthand corner of your Business Central home screen.
Enter Sales Statistics into the Search Bar.
Select the type of sales statistics you would like to access and review the specific insights on each page.

With these steps, you can easily create sales quotes, convert them to sales orders, create sales invoices, and monitor your sales performance.
Training Video: How to Manage the Sales Process in Microsoft Dynamics 365 Business Central
If you have any questions about this topic or any other Dynamics 365 related enquiry, get in touch with the experts at Kwixand Solutions. For more Business Central training videos, don't forget to subscribe to our YouTube channel and follow us on LinkedIn, Facebook, Instagram, and Twitter.


